Showing posts with label 3D projects. Show all posts

Wednesday, April 27, 2016

You're So Lovely Project Kit

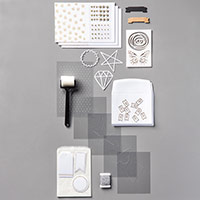
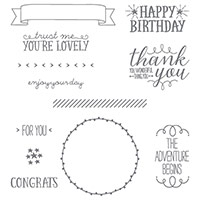
The You're So Lovely Project Kit includes supplies to make 12 adorable cards AND 12 bags with tags. But that's not all.  You can use those same supplies to make 36 treat packages instead.  Wow! Talk about endless kit possibilities.  Watch Stampin' Up! concept artist, Melody, and trainer, Andrea, as they show how to use the kit to create the treat packaging.


This kit and stamp set will be retiring soon!  Make sure you pick one up before they are gone forever!

Saturday, December 20, 2014

Autumn Wine Bottle Tag

Hi Stampers!

Today I have a non-card project for you.  Here is a festive way to dress up a bottle of wine that you may be giving as a gift this holiday season.  The one I have posted here is done in all Autumn colors, but this could very easily be done in Christmas colors for a last minute way of dressing up a bottle.  This would be a great hostess gift to give at a holiday party! 

I used my hot glue gun for creating the medallion and attaching it to the ribbon.  It just has a much better hold for this type of project than any other adhesive.


I love the burlap ribbon that Stampin' Up! sells.  It's perfect for making bottle tags because it lays so nicely!   I made my ribbon tails longer and then trimmed them down to the length I wanted right at the end.  I wanted my tails to come past the label so that it was more covered up.  That way the recipient moves the tag to the side to see what type of wine you gave them - it's kind of like unwrapping but with less mess! 

The banner was stamped using my Stamp-a-majig so that I could get perfect placement.  After stamping, I made the score lines on either side of the stamped image and then a second set of score lines 1/4" away from each of the first score lines.  After I did all of that, then I cut the flagged ends by hand. 


Do you like to dress up the bottles that you are giving this holiday season?  Let me know in the comments!

Stampin' Supplies:

Monday, March 10, 2014

Take a Tour of the Feb 2014 Paper Pumpkin Kit

Hi Stampers!

Hope you all had a great weekend!  Are you excited for daylight savings time?  I love it!  I finally get to see the light of day!!!  Yay!

Today I have a tour of the February My Paper Pumpkin kit.  My Paper Pumpkin is the monthly paper crafting kit from Stampin' Up!  It's so much fun to get a little surprise crafting kit in the mail every month.

As usual, I open the kit to find a little thank you note from Stampin' Up!

This month we received photopolymer stamps!  Yay!  I love the photopolymer stamps so much because they are clear!  That means you can see where you stamp.  That means perfect stamp placement - and that means that all of your friends will be super impressed with your beautifully stamped projects. 

There are two stamps, a polka dot circle and a striped circle.  This month's Stampin' Spot is Pistachio Pudding - one of my favorite new In Colors.


Here's the packet with instructions and supplies.  This month we are creating adorable little gift bags!


Five craft gift bags.  Five!


Four sheets of punch out alphas in Baked Brown Sugar.


Bermuda Bay punch out circles and Whisper White "star burst" style punch outs.


The kit also comes with 10 pieces of Whisper White wide grosgrain ribbon, a ton of mini clothes pins, some Crushed Curry baker's twine, and Dimensionals!


Some people have some issues with photopolymer stamps because when they first go to use them, sometimes they have problems with getting a nice, crisp stamped image.  The problem is that in the manufacturing process, there is a residue that's on the stamps.  The best way to get rid of the residue is to "dirty" up your stamps.  What I have found is that all you need is a handy, dandy eraser!


Remember these eraser pencils?  This is my favorite stamp dirtying tool.  I erase the whole stamping surface of the stamp to dirty it up.  Then I will ink up the stamp and stamp on a piece of scratch paper a couple times.  Then I'll clean the stamp with my Stampin' Scrub and I'm good to go!


Now on to the project.   I stamped the polka dot circle, in Pistachio Pudding ink, on the star burst circles.  I adhered them to the Bermuda  Bay circles.


Then I selected the letters I wanted to use and popped them up on Dimensionals.


This is what the panels look like all put together!


Now on to the bag!  First you want to put a knot at the end of one piece of ribbon.


Thread the ribbon through the first hole from the inside of the bag to the outside.  Then thread it through the second hole from the outside to the inside.  Knot the other end.  Repeat on the other side of the bag with a second piece of ribbon.


Using the mini clothes pins and baker's twine, I first clip on the first and last letter.  Then I add in the remaining letters.  If you want to have a sort of permanent way of keeping the letters on, I taped them on to the bakers twine and then put the clothes pin on.

Here's the finished bag!


I made up four more.  Two I personalized with people's names and two I just put "enjoy" on.  I figured that it's a nice, general word to put on a gift bag and can be used for many occasions!


Check out all of the leftovers!  I'm stashing these away because I think they would be great for cards and scrapbook layouts.  Plus these stamps will be so useful for other types of cards!


I hope you enjoyed the tour through this month's Paper Pumpkin!  If you are interested in becoming a member of the My Paper Pumpkin subscription now is a great time!  From now through March 31st, 2014, any new subscriber will get two bonuses!  With your starter kit, Stampin' Up! will also send you a pack of 2012-2014 In Color Stampin' Write markers (a value of $14.95) and as a personal thank you for subscribing in the month of March, I will send you a free mystery prize!  Click on the link below to join.


Friday, September 20, 2013

By The Tide Class Favor

Hi Stampers!

I think one of the most popular stamp sets amongst my customers is the By The Tide stamp set.  It's a great set for all types of cards - including a lot of masculine cards.  Today I'm sharing the little favor I made for each of my customers.  I couldn't resist filling the 1x8 cello bags with some Swedish Fish candies.  Yum!


Here's a close up of the tag.  I love using the little pearls as bubbles for this adorable little seahorse!


Stampin' Supplies:
Card Stock: Whisper White, Soft Sky
Stamps: By The Tide, Express Yourself
Ink: Pistacio Pudding, Soft Sky, Basic Gray
Big Shot: Deco Labels Collection Framelits
Embellishments: Basic Pearls, Linen Thread, 1"x8" Cello Bags

Friday, July 19, 2013

Customer Spotlight - Bloomin' Bouquet Project Kit!

Hi Stampers!

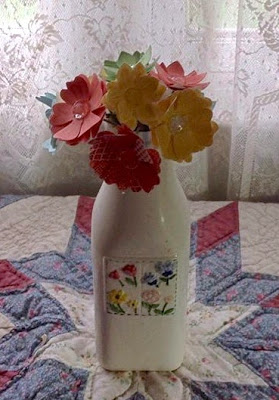
Today I have another Customer Spotlight for you.  This project comes from Carol S.  She created a beautiful piece of decor using the Bloomin' Bouquet Project Kit.  Didn't she do a fabulous job?  I love the milk bottle she used as a vase for the flowers.


You can make a lovely bouquet too!  

Ordering information:

Item 134542 $12.95

Available starting April 29, while supplies last.

Kit contents:
  • 2 sheets of preprinted and precut flowers on 12" X 12" cardstock; makes 13 flowers using Pool Party, Gumball Green, Calypso Coral, Daffodil Delight, and Rich Razzleberry
  • 13 Vintage Faceted Buttons
  • 13 green floral wire stems
Adhesive not included. (Glue gun recommended.)


Monday, July 15, 2013

Lacy & Lovely Treat

Hi Stampers!

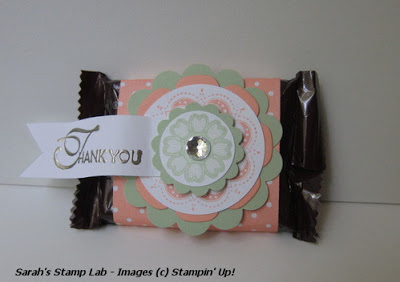
Today I am sharing a little favor that I made for my recent Lacy & Lovely class.  This is based on a favor that I had seen on Connie Babbert's blog.  I made it a little wider to accommodate two little Hershey bars and I changed all of the colors because I was dying to play with the new In Colors.  I love pairing up Pistachio Pudding with Crisp Cantaloupe.


Stampin' Supplies:
Cardstock: Whisper White, Crisp Cantaloupe, Pistachio Pudding
Designer Series Paper: 2013-2015 In Color Designer Series Paper stack
Stamps: Lacy & Lovely
Ink: Pistachio Pudding, Crisp Cantaloupe, Versamark
Punches: 1" circle, 1-1/4" scallop circle, 1-3/4 circle, 2-3/8" scallop circle
Other: Pewter Embossing powder, Floral Framelits, heat tool, large Basic Rhinestones

Friday, May 10, 2013

Baltimore Regional Make and Take

Hi Stampers!

Today I'm sharing with you one of the Make and Takes from the Baltimore Regional.  I was so busy swapping and looking at all of the samples there that I ran out of time to make my project, so I brought it home!  At the regional, the Clockworks stamp set was used, but I switched it up and used the Oh, Hello stamp set.  I LOVE this stamp set so much!

Here's the project - a cute notepad cover!


I have a spritzer filled with isopropanol and a few drops of champagne shimmer paint. I love the little bit of sparkle it adds to my projects.


This accent is actually two of the Vintage Faceted buttons layered on top of each other.


Stampin' Supplies:
Cardstock: Basic Gray, Whisper White, Gumball Green, More Mustard, Pool Party, Calypso Coral
Stamps: Oh, Hello, Loving Thoughts
Ink: Pool Party, Basic Gray, Calypso Coral, Gumball Green
Embellishments: Vintage Faceted Buttons, Calypso Coral Baker's Twine
Punch: Fancy Flower
Other: Simply Scored

Friday, March 22, 2013

My Paper Pumpkin is Finally Here!

Hi Stampers!

This week I received my Welcome Kit for the My Paper Pumpkin Kit Club.  It was so exciting to see the box waiting for me when I got home. I knew that in a matter of minutes I would have some fun projects completed!  The Welcome Kit is the first kit that you will receive when you sign up for the subscription, no matter what month.  If you cancel and then re-subscribe you will receive the Welcome Kit again.  Just thought I would pass along that bit of info to you!


Look on the Stamp Lab blog every month to see that month's kit as well as additional projects you can make using the kit supplies.  Did you miss a post?  No worries, all of the My Paper Pumpkin posts will be listed under the My Paper Pumpkin tab at the top of the page.  Remember, a lot of the stamps provided in the kits will be exclusive kit designs and they will not be available for purchase from Stampin' Up!


So this is what the kit looks like when you first open it.  In the future your kit will come in the orange My Paper Pumpkin box.  Stampin' Up! had a lot of the Welcome Kits still in the brown craft boxes.  No worries, it's still adorable!


There is a sweet little note inside the box.


Wrapped up in tissue - makes you feel like it's Christmas morning!


Inside you will find a Basic Gray Stampin' Spot and your exclusive stamps for this kit.


This is the kit packet.  The color image is your set of instructions.


Everything you need to make fantatic projects.  Colors featured are Basic Gray, Daffodil Delight, Lucky Limeade, Whisper White, and Tempting Turquoise.  In the welcome kit you will also get a D Block as a thank you for joining gift!  Save this block for use with future kits.


When opening your Stampin' Spot, keep the sticker on one side still intact.  This way you won't loose your lid!


I made 4 different projects with this kit.


This card was made following the instructions included with the kit.


This one features the same components with a different layout.  Also, I only inked up the "hey there" part of the stamp.  This is easy to do with the Stampin' Spot.  I also stuck the green circle to the card and then stamped the splatter spots overlapping the green circle.

With a few extra items you can go from a more masculine card type/design to one that's more feminine and whimsical.  I cut the Daffodil Delight banner on the opposite end with a fish tail and used two of the scalloped stickers to create a sentiment banner.  I punched out some Basic Gray butterflies with the Bitty Butterfly punch, and stamped the splatter marks on them.  Then I added some sparkle with a Large Basic Rhinestone.


Finally I used the remaining kit components to make this little box to hold some treats!


Here's how you create the box:

1. Decorate the short edge of the card base with an Edgelit or border punch.  Here I used the Finishing Touches Edgelit.


2. Place the short edge of the card stock on the top of your Simply Scored tool and score at 1-1/8" and 4-3/8".


3. With the long edge on the top of the Simply Scored tool, score at 2" to the score line, and score at 5-3/8".  You will automatically have a score line at 4-1/4" because the card base is pre-scored.


4. Cut out the two rectangles starting from the 2" score lines.  You can use these scraps for punching out the butterflies featured in the card shown above.


5. Cut along the remaining two score lines to make flaps.  Fold along all of the remaining score lines and use your bone folder to make crisp creases.


6. Apply Sticky Strip as shown.


7. Assemble the box and decorate!


Feel free to contact me with any questions or if you would like to order any of the extra supplies used to make these projects.  

If you would like to sign up for My Paper Pumpkin, visit the website and kindly select me, Sarah Souza,  as your demonstrator.