Sunday, March 31, 2013

Happy Easter!

Hi Stampers! 

Today I have a special Easter Sunday post for you!  I wanted to share with you the gifts I made to give my family for Easter.  Normally we buy each other candy, but I thought a nice home baked treat would be even better.  (I'm still giving them candy, too!)  I love this banana bread recipe from the Cookies and Cups blog.  I love it so much that I have been collecting bananas in my freezer for weeks to have enough to make 6 batches of batter.  (Hint - if you want to find the mini PB cups at the best price get a giant box of them from Costco.)  Of course, I also have to dress the loaves up with some stamping!

I made this adorable little tag with just a few supplies, including the Everybunny stamp set.  It was quick and easy!  I used my blender pens and ink pads to water color the image.  Remember when you are watercoloring an image, be sure to use StazOn ink to stamp the image outlines.  I added a sentiment to the bottom and cut it out with the oval framelits.  Then I matted the image with the next size up oval which I cut out of Primrose Petals Core'dinations card stock and embossed with the Fancy Fans embossing folder. 


Here are the breads all wrapped up and ready to go!


I used the 1-1/4" Two-Tone Ribbon in Pink Pirouette/Rose Red to wrap around the loaf and tied it in a bow.


Then I also made some quick little treat bags.  Each bag was tied with Old Olive 3/8" Striped Organdy Ribbon.  Then, I took the small size bottle cap a and ran it through the Big Shot.  I used the 1/2" circle punch to punch out discs of Summer Smooches DSP.  I glued the DSP in the bottle cap and filled in the cap with Crystal Effects.  After adding the Crystal effects, I sprinkled on some Dazzling Diamonds for extra sparkle.  When the cap was dry, I applied it to the ribbon with a dimensional.


I hope you have enjoyed seeing my Easter treats.  Have a wonderful Easter!!!!

Friday, March 29, 2013

Easter Card!

Hi Stampers!

The week has finally come to an end.  I am so happy the weekend is here.  I have two family dinners to go to and a lot of baking ahead of me.  Today I have my Easter card to share with you.  I have been seeing a lot of these punch art bunnies on the web lately.  I decided to make mine a chocolate bunny, and everyone knows that the best part of a chocolate bunny is the ear!  Yum!

You only need three punches to make this bunny.  It's so easy!  Don't have the SU Flower trim?  1. Well, what are you waiting for? 2. You can use a button, a brad, a pearl, a punched flower, etc, etc.  Lots of alternative options!  (But I still think you would LOVE the flower trim!)


Here is the card interior.  I used the Designer Typeset Photopolymer stamp set to create a custom sentiment.  Love it!  The possibilities are endless!!!!


Stampin' Supplies:
Embellishments: 5/8" Flower Trim, Basic Pearls

Stay tuned for a special post on Easter for another quick and easy gift project!


Wednesday, March 27, 2013

Sent With Love

Hi Stampers!

I finally got around to playing with the stamps and Designer Series paper from the Sent with Love product suite.  I love the color combo on the papers - Island Indigo, Pool Party, Calypso Coral, Real Red...it's just a fun combo to work with.  

One of the paper designs has all of these fun little tags that you can cut out.  Of course, you can just use the paper as is and it would be fabulous, but we stampers love to alter things!  So in this card, I cut out one of the tags, matted it, and stamped my sentiment.  It made for a no-brainer embellishment!

These items are only available until April 30th.  Click on the promotions tab at the top of the page for more information on how to order the stamps and paper, or how to save 15% by purchasing the bundle!


Stampin' Supplies:
Designer Series Paper: Sent with Love
Stamps: Curly Cute
Ink: Real Red

Monday, March 25, 2013

Final Brides and Babies Card!

Hi Stampers!

Today I have the last card from the Brides and Babies Stamp a Stack.  Today's card was inspired by the card featured on page 28 of the 2013 Spring Catalog.  I liked using the Simply Scored tool to add texture to the card stock.


Here's a close up of the focal point.


Stampin' Supplies:
Designer Series Paper: Sunshine and Sprinkles
Stamps: Rain or Shine
Other: Basic Rhinestones, Sharpie marker, Simply Scored

Don't forget that the Fabric Frenzy sale begins today.  See the Promotions tab for more information on how you can get fabulous SU fabric for 50% off.


<a href="https://www.bloglovin.com/blog/6428217/?claim=3xhy8yrak74">Follow my blog with Bloglovin</a>

Saturday, March 23, 2013

Fabric Frenzy and This and That!


Hi Stampers!

I have two exciting promotions to tell you about today.  First up is the Fabric Frenzy Event!

Promotion Dates: March 25 - March 31

Seamstress or not--you'll love using our high quality Designer Fabric--especially at 50 percent off!  Our Designer Fabric is designed to coordinate with Stampin' Up! inks, paper, and other accessories, and is perfect for adding a stylish touch to traditional paper projects.  Available in an extra-wide fat quarters (18" x 26"). Use it for quilting, clothing, home decor, and more!

Page Item       Description                                        Retail Price    Sale Price
170   126892   Essentials Designer Fabric                    $29.95           $14.98
171   126893   Floral District Designer Fabric               $9.95             $4.98
171   126894   Comfort Cafe Designer Fabric                $9.95              $4.98 
171   125411   Summer Smooches Designer Fabric        $9.95              $4.98
171   125412   Twitterpated Designer Fabric                 $9.95              $4.98
171   122337   Timeless Portrait Designer Fabric           $9.95              $4.98
171   122336   Beau Château Designer Fabric               $9.95               $4.98  
171   124066   Spice Cake Designer Fabric                   $9.95              $4.98
171   122335   Flirtatious Designer Fabric                   $9.95               $4.98
6*     129309   Tea for Two Designer Fabric                 $9.95               $4.98
13*   129307   More Amore Designer Fabric                 $9.95               $4.98
*Spring Catalog
All items are limited quantity at the discounted price; the discount will be removed once the limit is reached.


Your life is: Awesome. Quirky. Exciting. Perfectly messy.  And happening really fast.   Se we're happy to introduce our newest product line that lets you capture it all on-the-go.  This and That will debut in the 2013-2014 annual catalog, but we're giving everybody a chance to get it now!

Item      Description                                                       Price
131268  Epic Day This and That Journal                           $10.95
130814  Epic Day This and That Designer Series Paper       $10.95
130133  Remember This and That Rotary Stamp               $5.95
131271  Epic Day This and That Designer Stickers              $4.95
131269  Epic Day This and That Designer Washi Tape         $4.95
133350  Epic Day This and That Bundle*                           $32.08
             15% OFF 
             *Includes the five This and That products listed above.
             Only available until April 30th.


  • We're introducing the line with these five products, but we'll be adding more This and That stuff as time goes on.
  • Bundle Dates: March 23-April 30 (remember the items that come in the bundle will be available in May and in the new catalog, but  we're only offering the discounted bundled until April 30 ).
  • You can place orders on any order type (customer, workshop, or online).
  • You can get as many This and That products or bundles as you want.
  • You can buy the This and That products separately. But why would you do that when you can get all five together and save 15 percent? 
  • Did your spidey eyes see that two of our In Colors (Calypso Coral and Pool Party) are included in the products? Your eyes were right. You'll just have to wait and see!

  • Click this link to see a video about This and That!


    Go here to be entered in Stampin' Up!'s free trip contest!


    Friday, March 22, 2013

    My Paper Pumpkin is Finally Here!

    Hi Stampers!

    This week I received my Welcome Kit for the My Paper Pumpkin Kit Club.  It was so exciting to see the box waiting for me when I got home. I knew that in a matter of minutes I would have some fun projects completed!  The Welcome Kit is the first kit that you will receive when you sign up for the subscription, no matter what month.  If you cancel and then re-subscribe you will receive the Welcome Kit again.  Just thought I would pass along that bit of info to you!


    Look on the Stamp Lab blog every month to see that month's kit as well as additional projects you can make using the kit supplies.  Did you miss a post?  No worries, all of the My Paper Pumpkin posts will be listed under the My Paper Pumpkin tab at the top of the page.  Remember, a lot of the stamps provided in the kits will be exclusive kit designs and they will not be available for purchase from Stampin' Up!


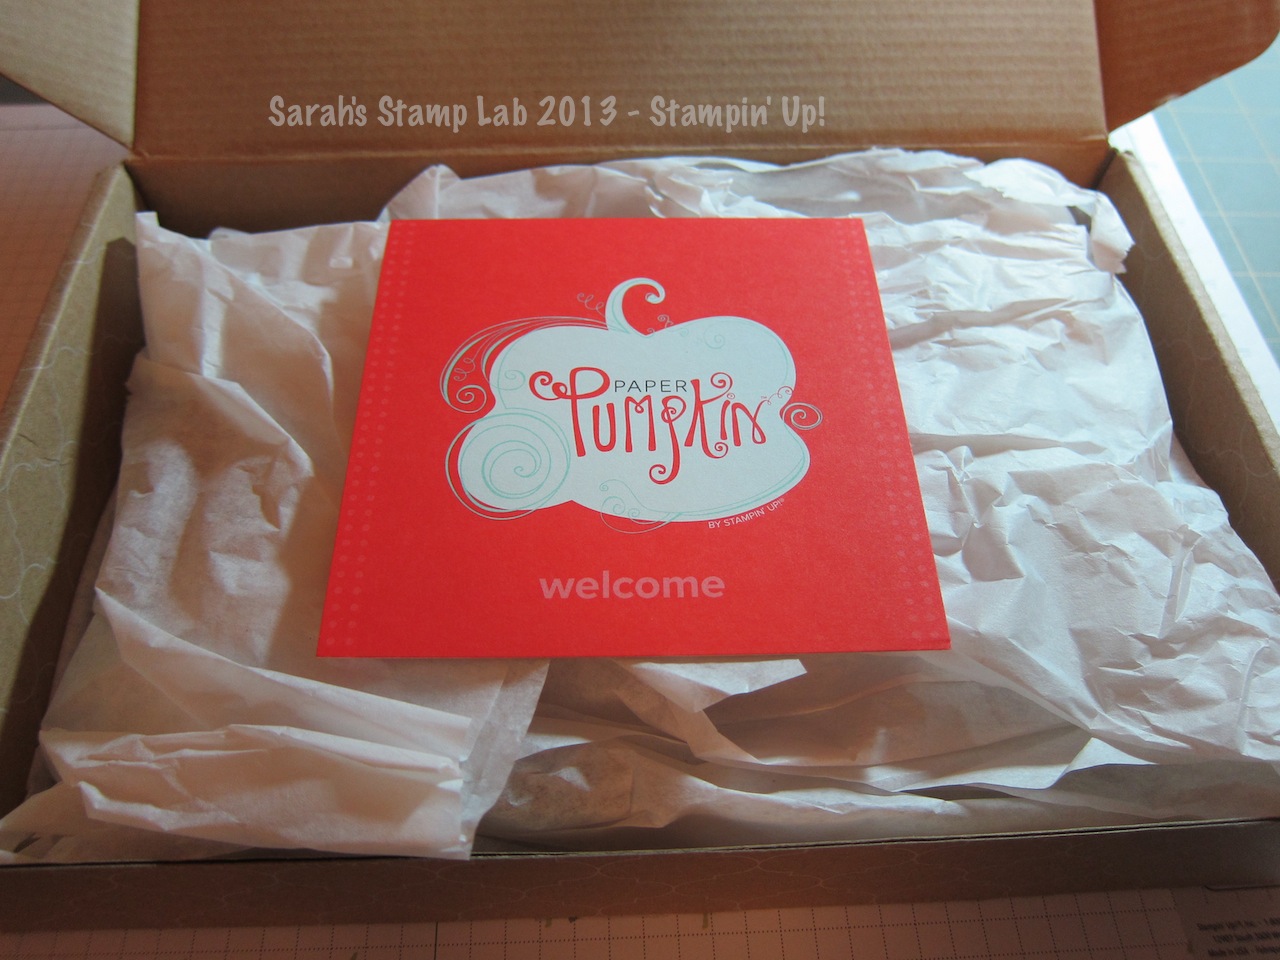
    So this is what the kit looks like when you first open it.  In the future your kit will come in the orange My Paper Pumpkin box.  Stampin' Up! had a lot of the Welcome Kits still in the brown craft boxes.  No worries, it's still adorable!


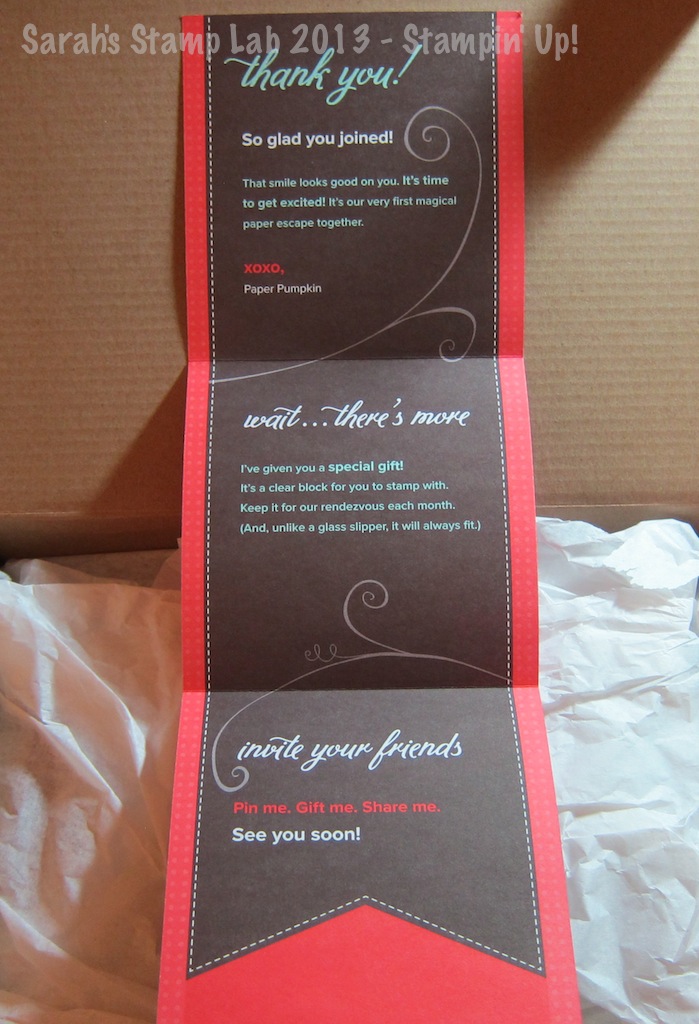
    There is a sweet little note inside the box.


    Wrapped up in tissue - makes you feel like it's Christmas morning!


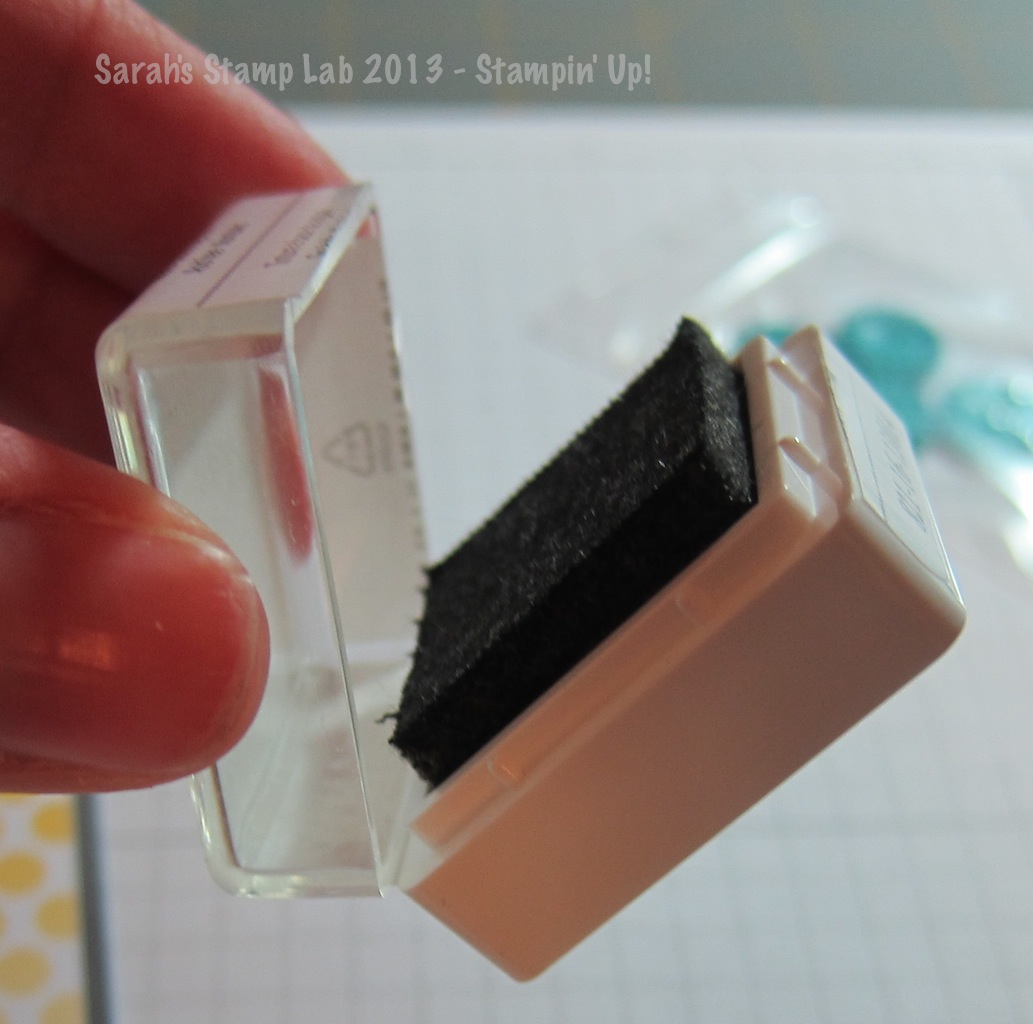
    Inside you will find a Basic Gray Stampin' Spot and your exclusive stamps for this kit.


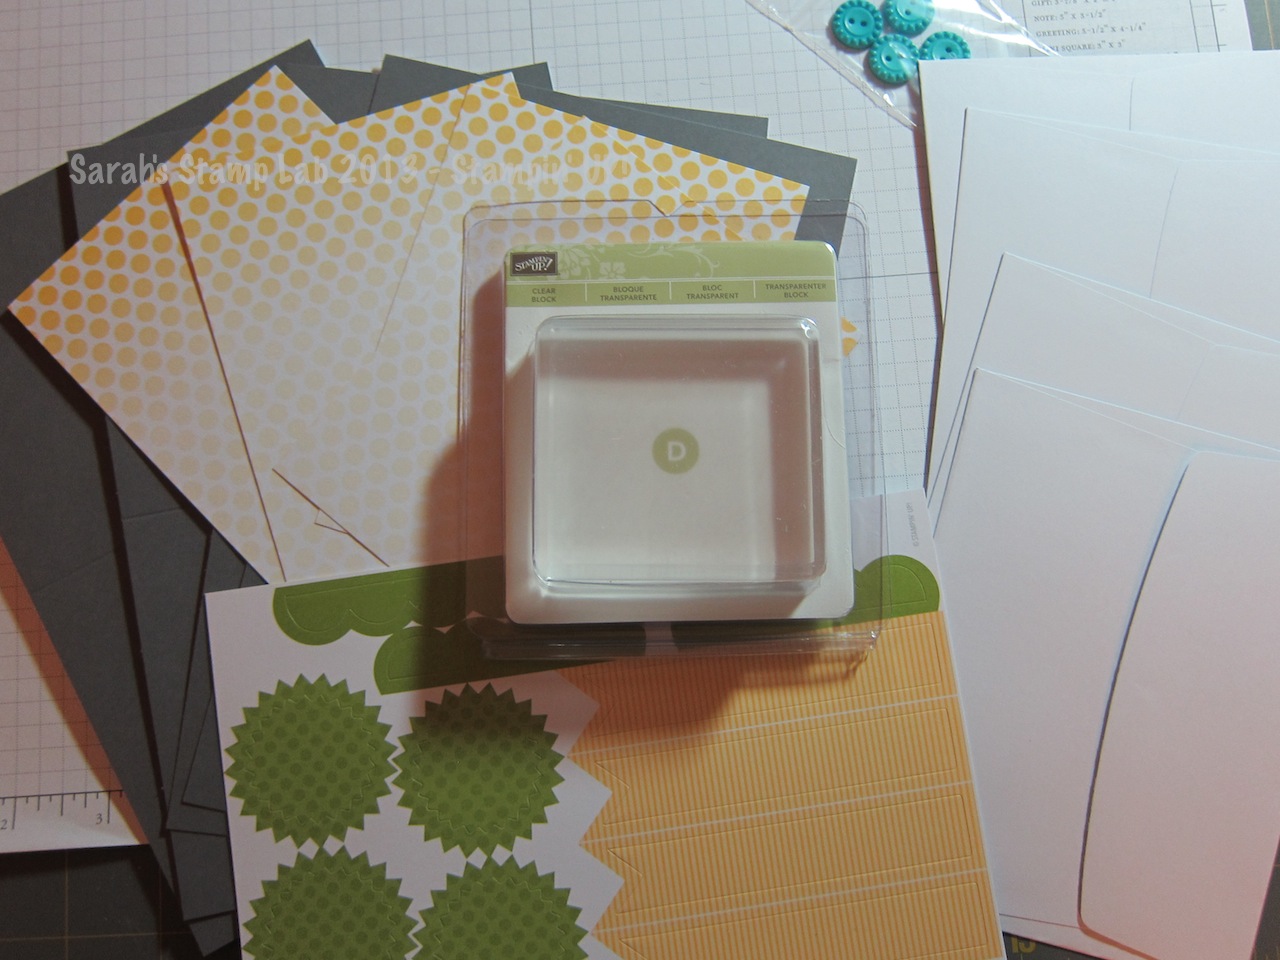
    This is the kit packet.  The color image is your set of instructions.


    Everything you need to make fantatic projects.  Colors featured are Basic Gray, Daffodil Delight, Lucky Limeade, Whisper White, and Tempting Turquoise.  In the welcome kit you will also get a D Block as a thank you for joining gift!  Save this block for use with future kits.


    When opening your Stampin' Spot, keep the sticker on one side still intact.  This way you won't loose your lid!


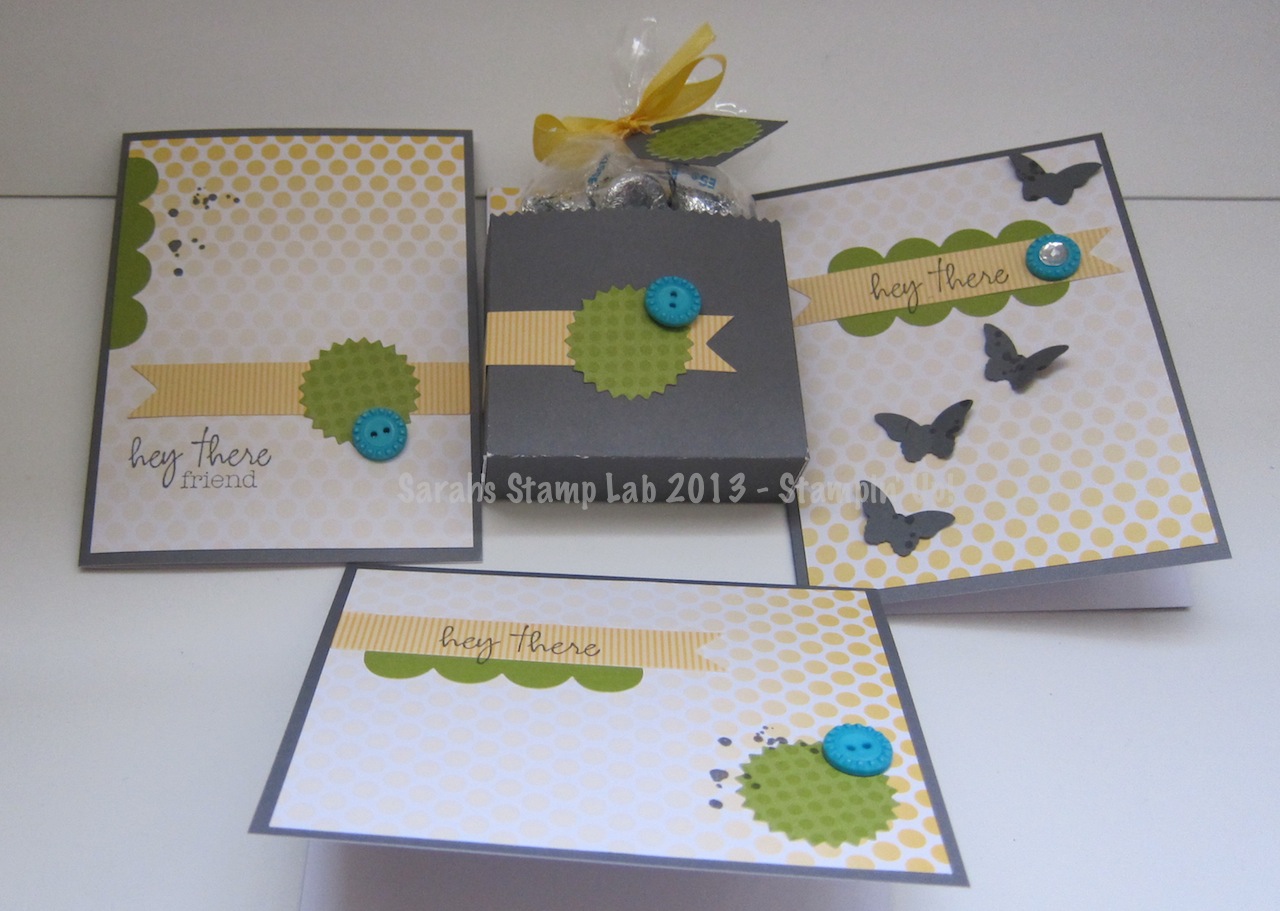
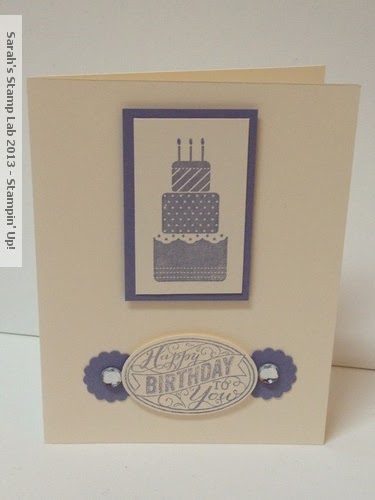
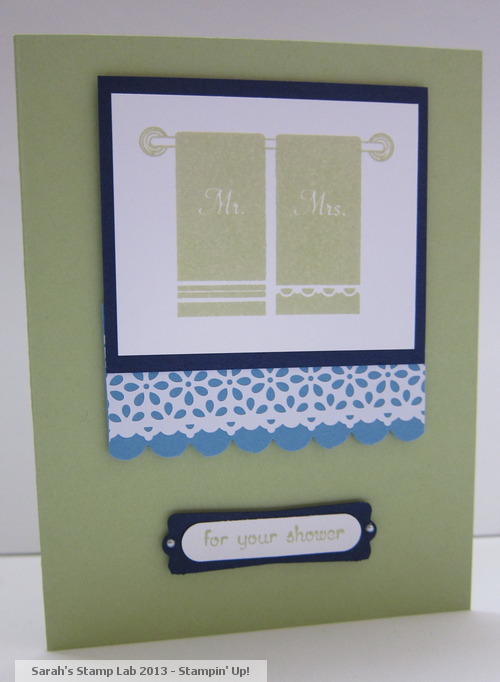
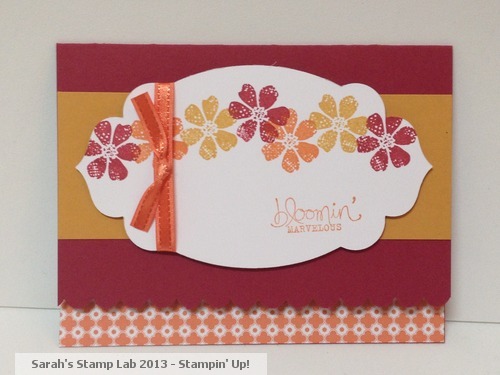
    I made 4 different projects with this kit.


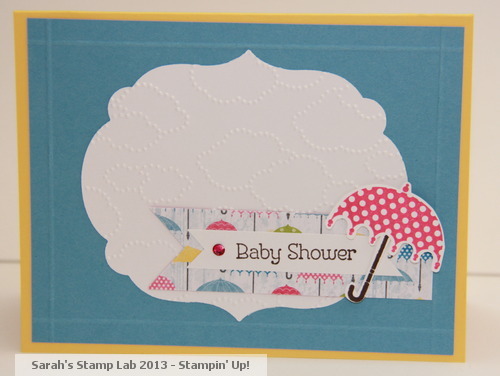
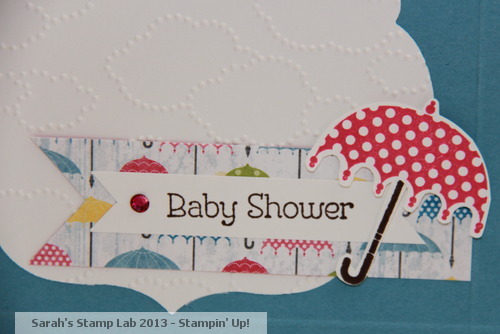
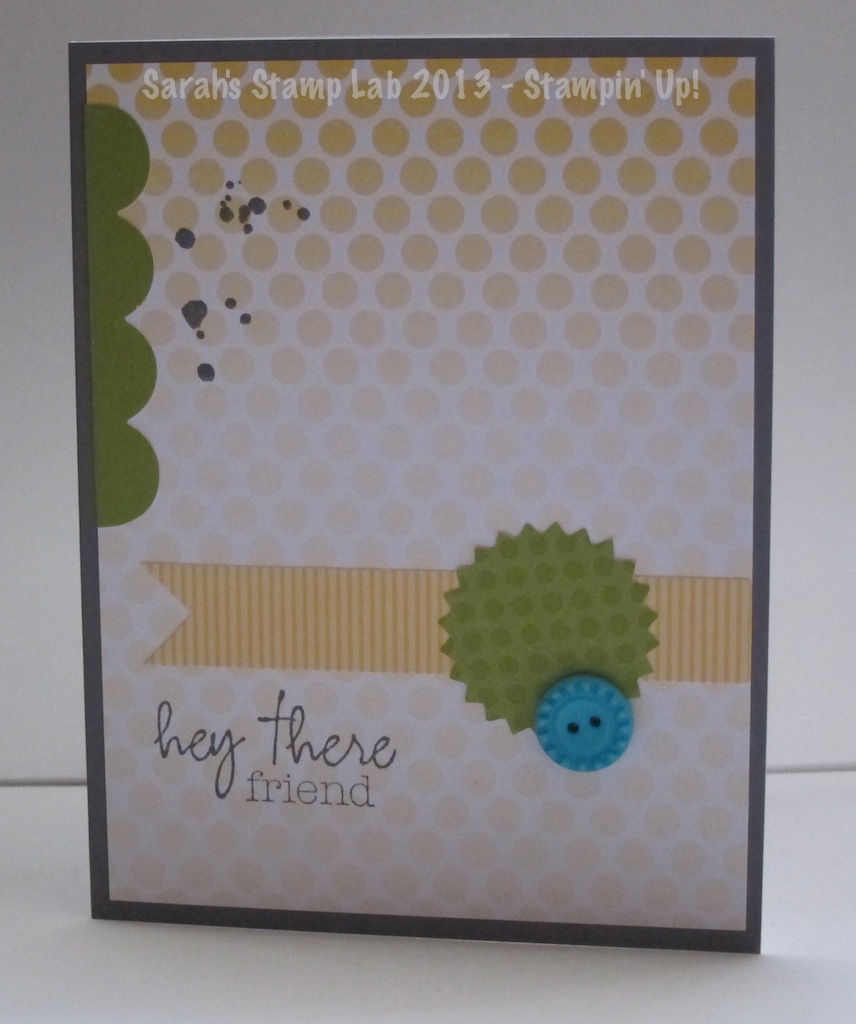
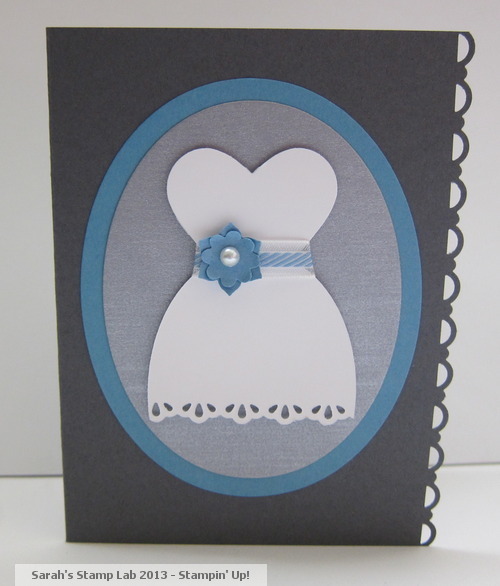
    This card was made following the instructions included with the kit.


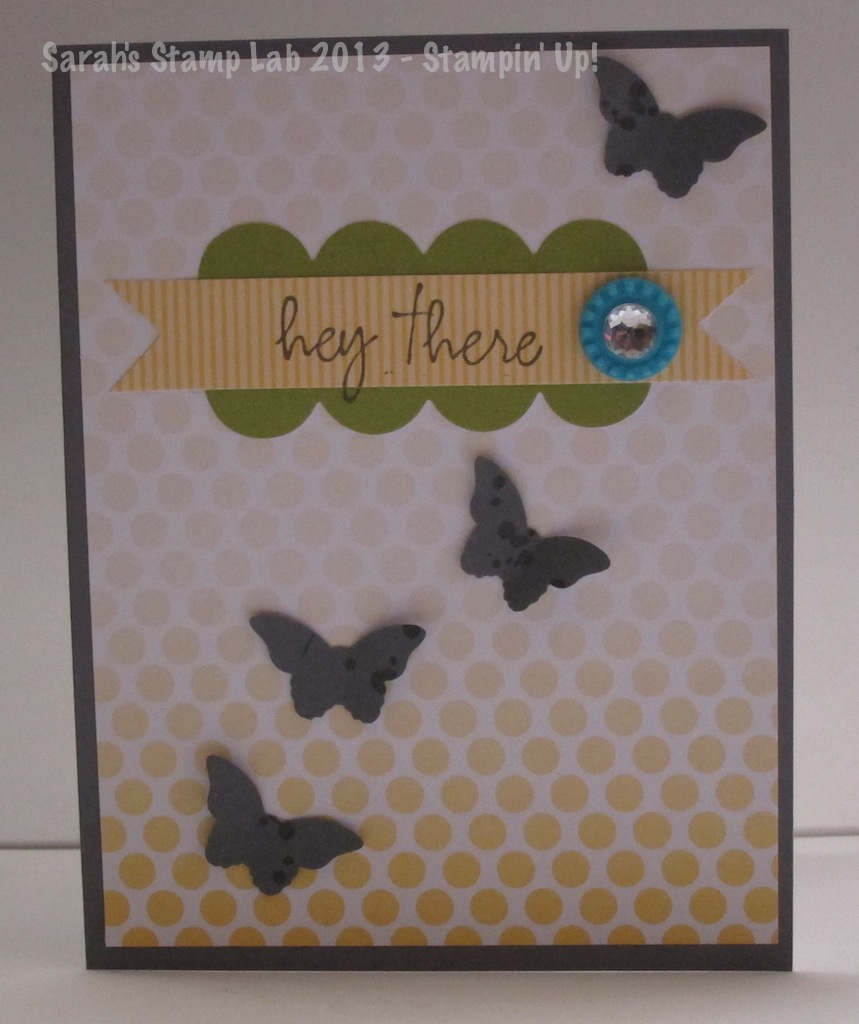
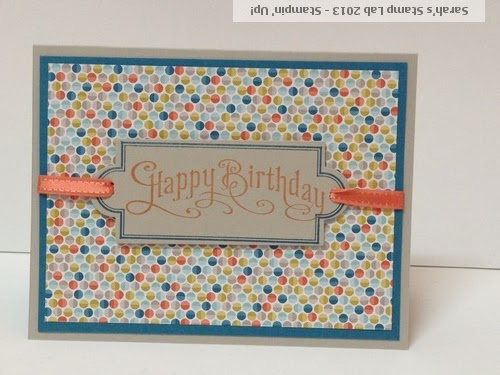
    This one features the same components with a different layout.  Also, I only inked up the "hey there" part of the stamp.  This is easy to do with the Stampin' Spot.  I also stuck the green circle to the card and then stamped the splatter spots overlapping the green circle.

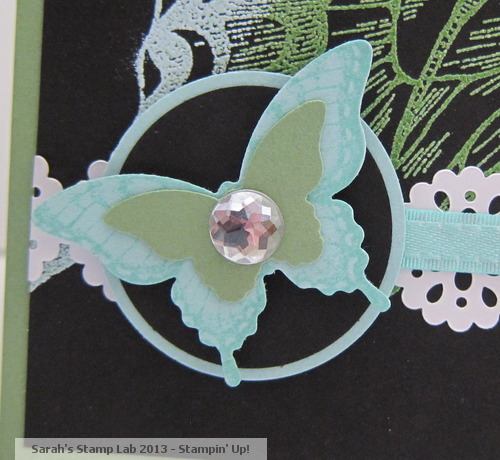
    With a few extra items you can go from a more masculine card type/design to one that's more feminine and whimsical.  I cut the Daffodil Delight banner on the opposite end with a fish tail and used two of the scalloped stickers to create a sentiment banner.  I punched out some Basic Gray butterflies with the Bitty Butterfly punch, and stamped the splatter marks on them.  Then I added some sparkle with a Large Basic Rhinestone.


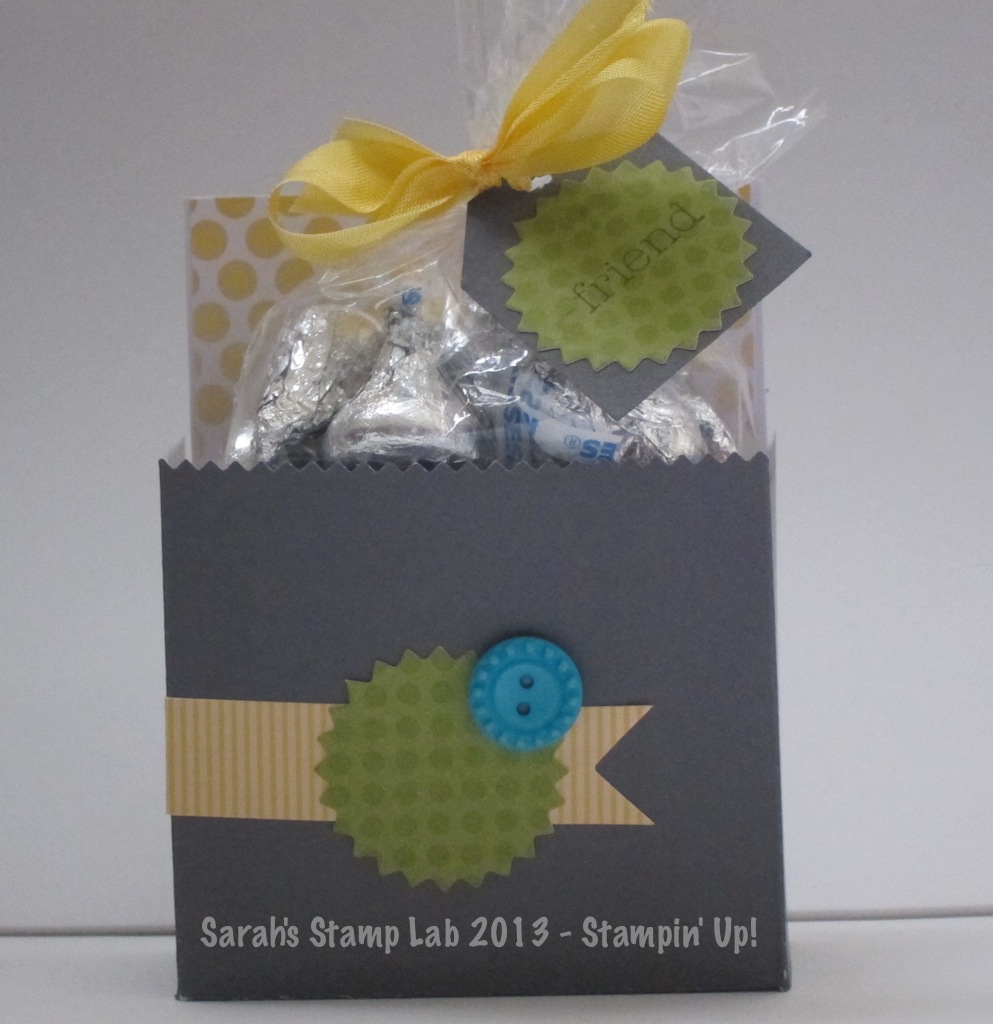
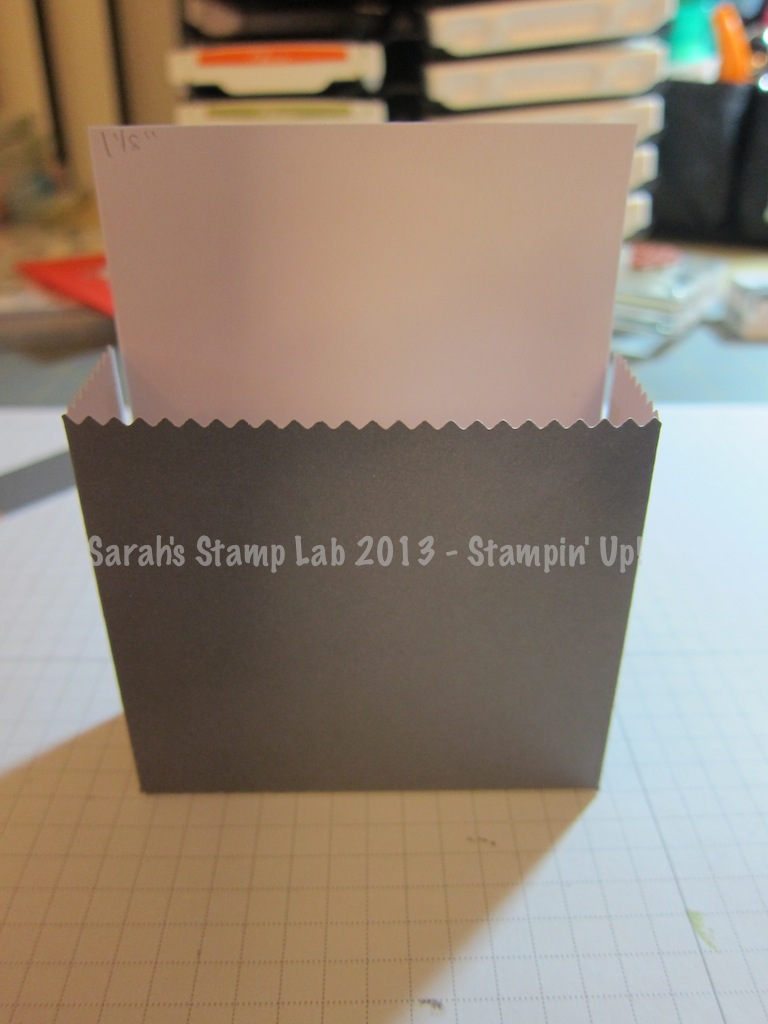
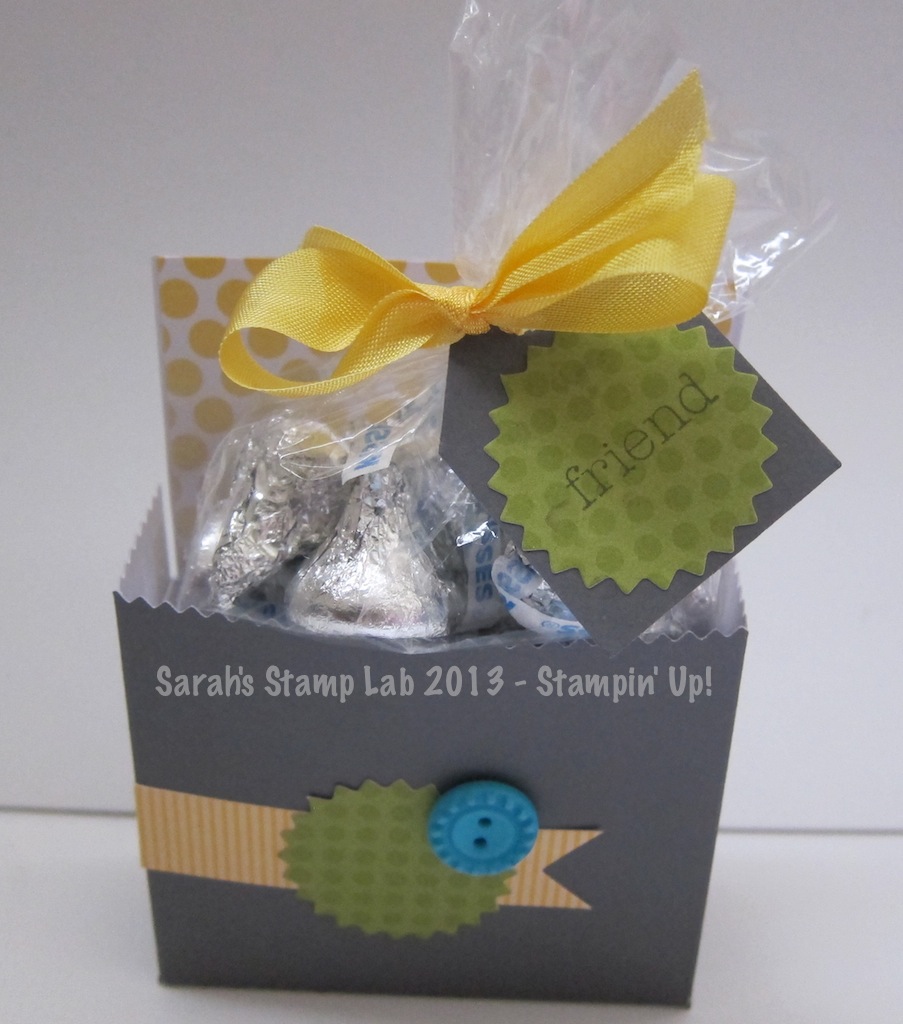
    Finally I used the remaining kit components to make this little box to hold some treats!


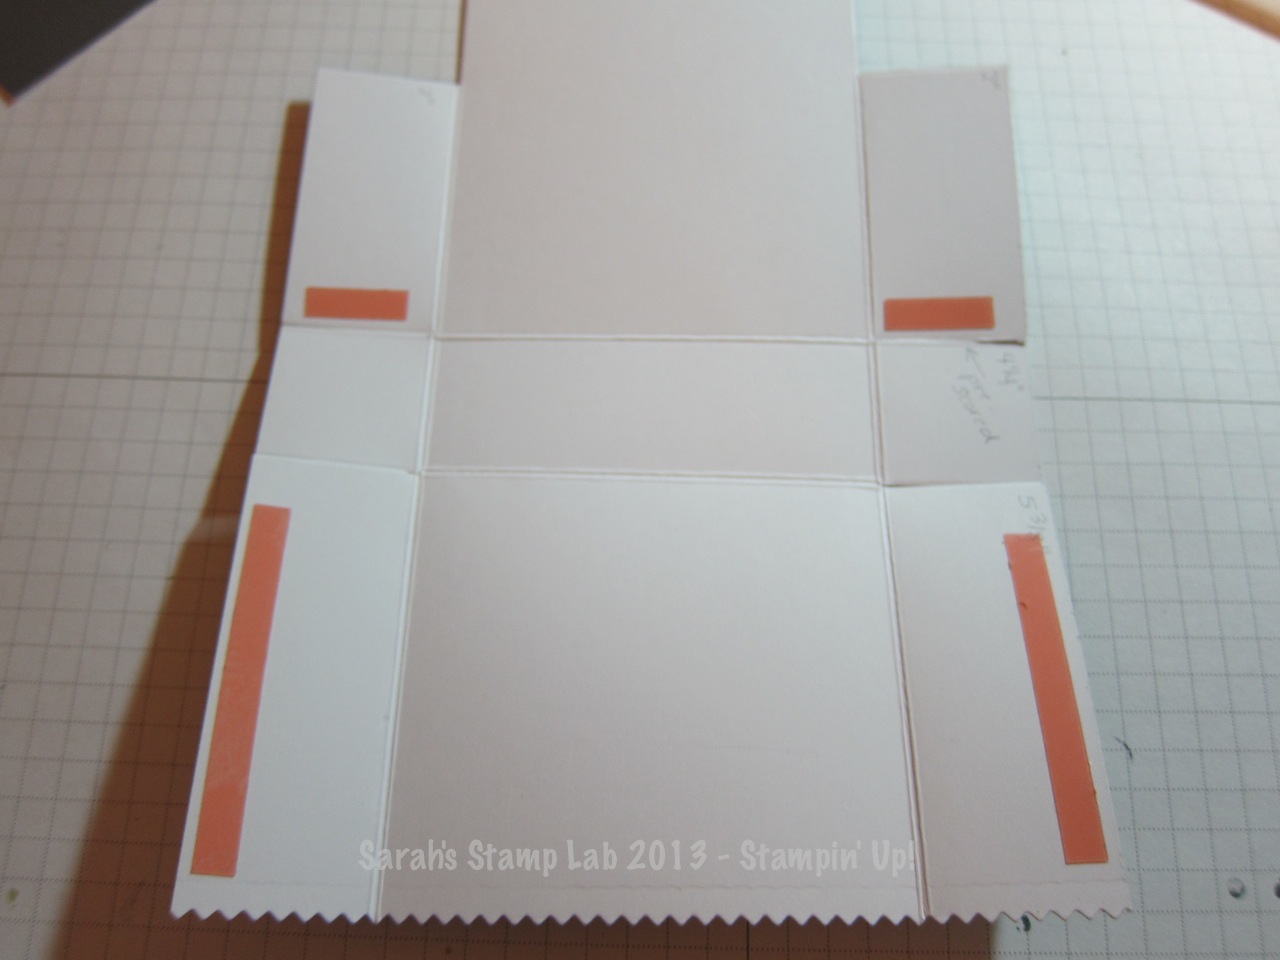
    Here's how you create the box:

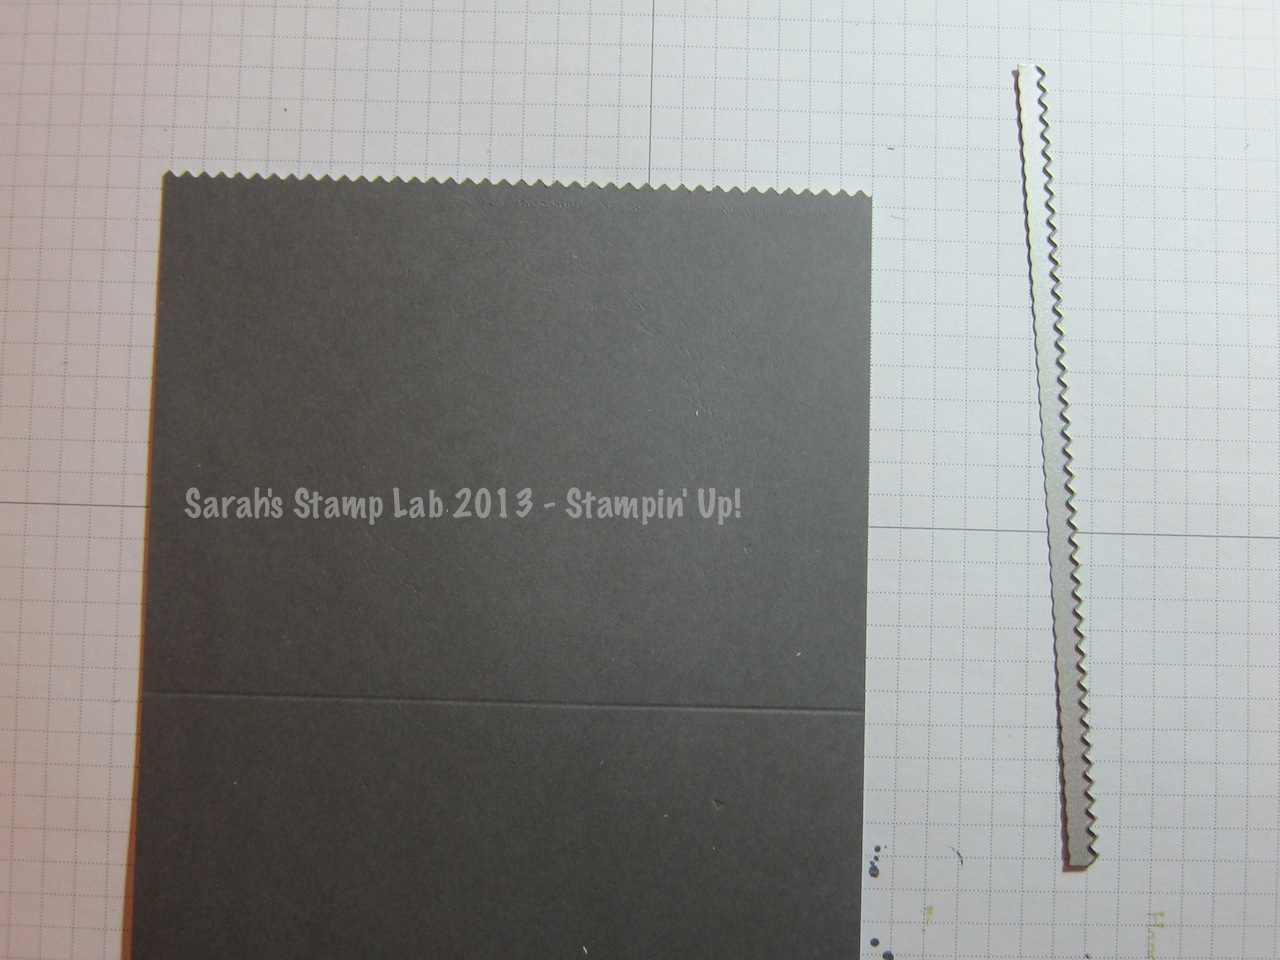
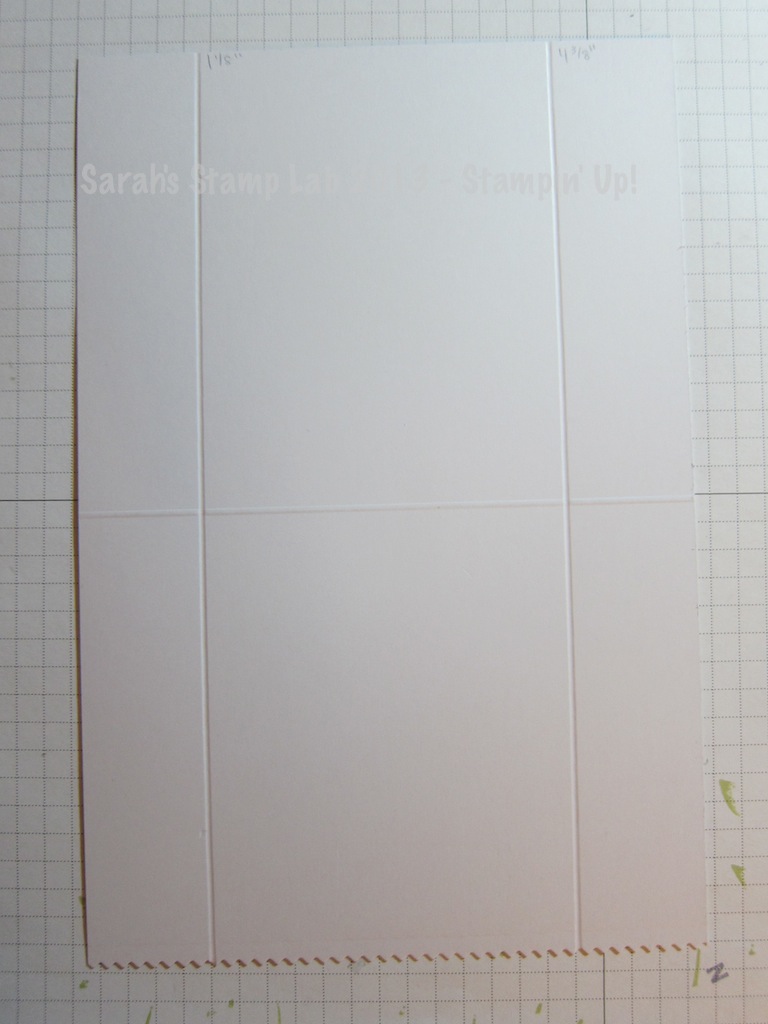
    1. Decorate the short edge of the card base with an Edgelit or border punch.  Here I used the Finishing Touches Edgelit.


    2. Place the short edge of the card stock on the top of your Simply Scored tool and score at 1-1/8" and 4-3/8".


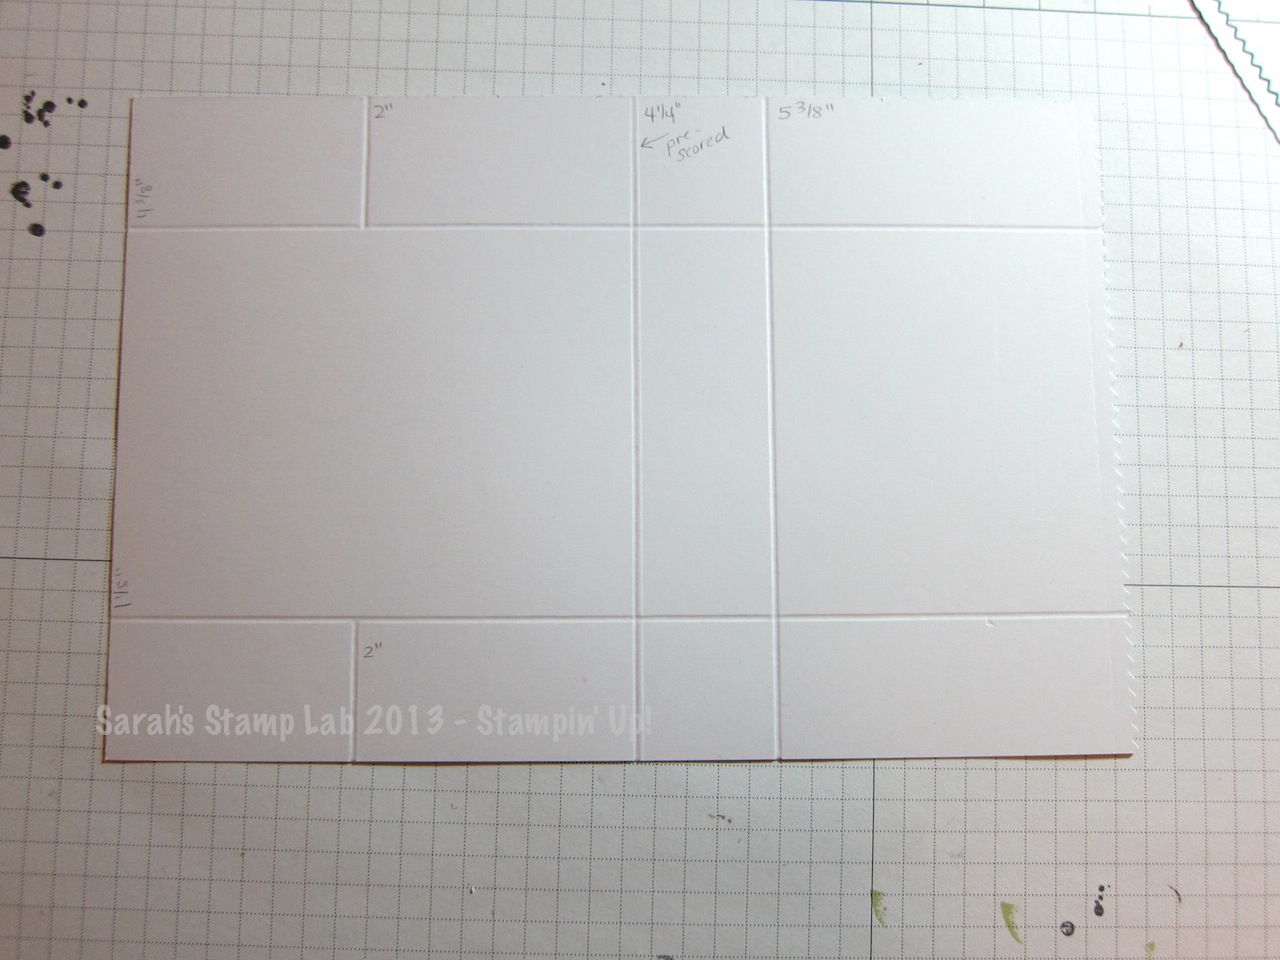
    3. With the long edge on the top of the Simply Scored tool, score at 2" to the score line, and score at 5-3/8".  You will automatically have a score line at 4-1/4" because the card base is pre-scored.


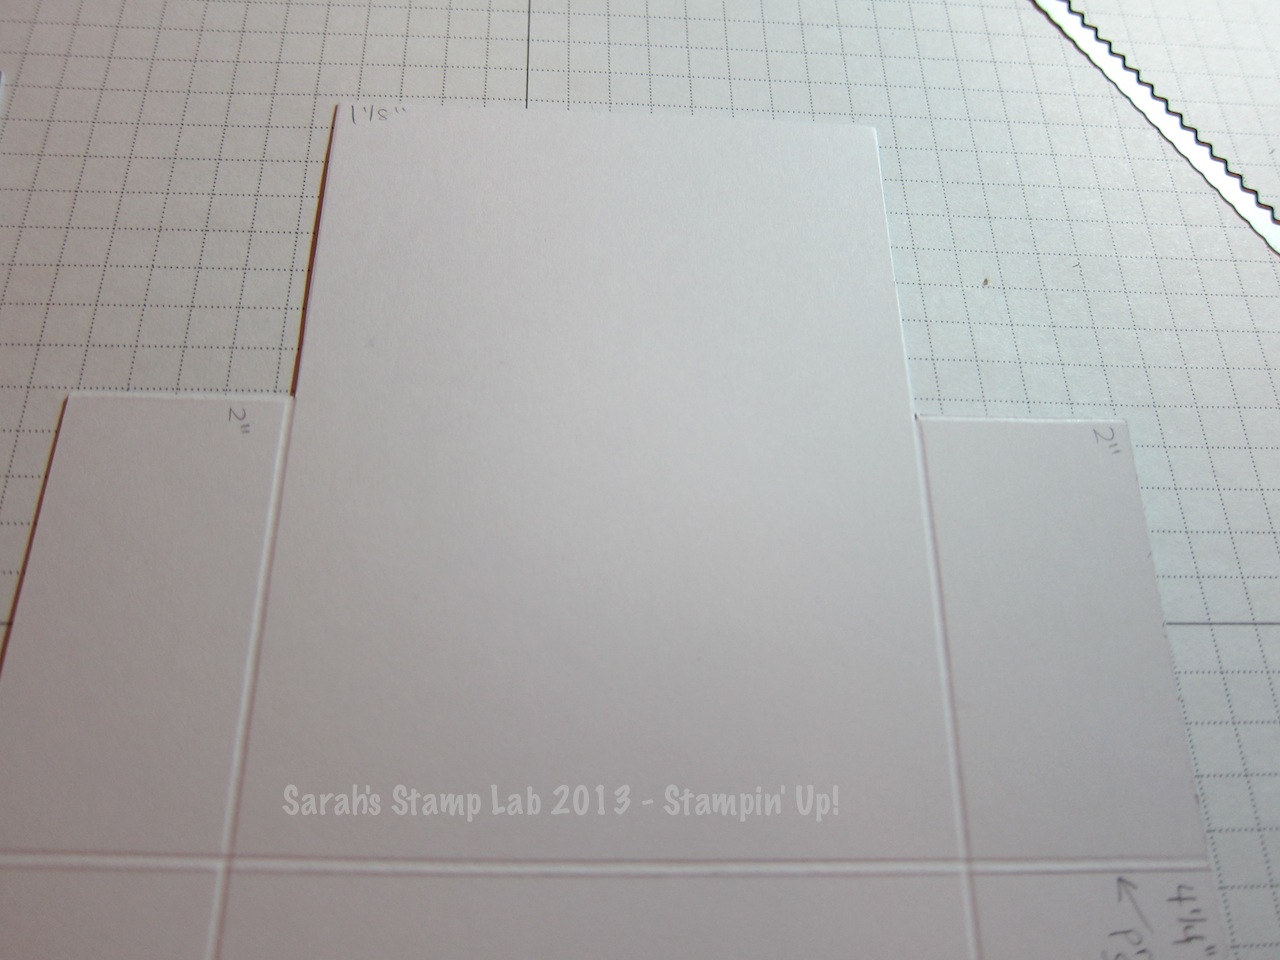
    4. Cut out the two rectangles starting from the 2" score lines.  You can use these scraps for punching out the butterflies featured in the card shown above.


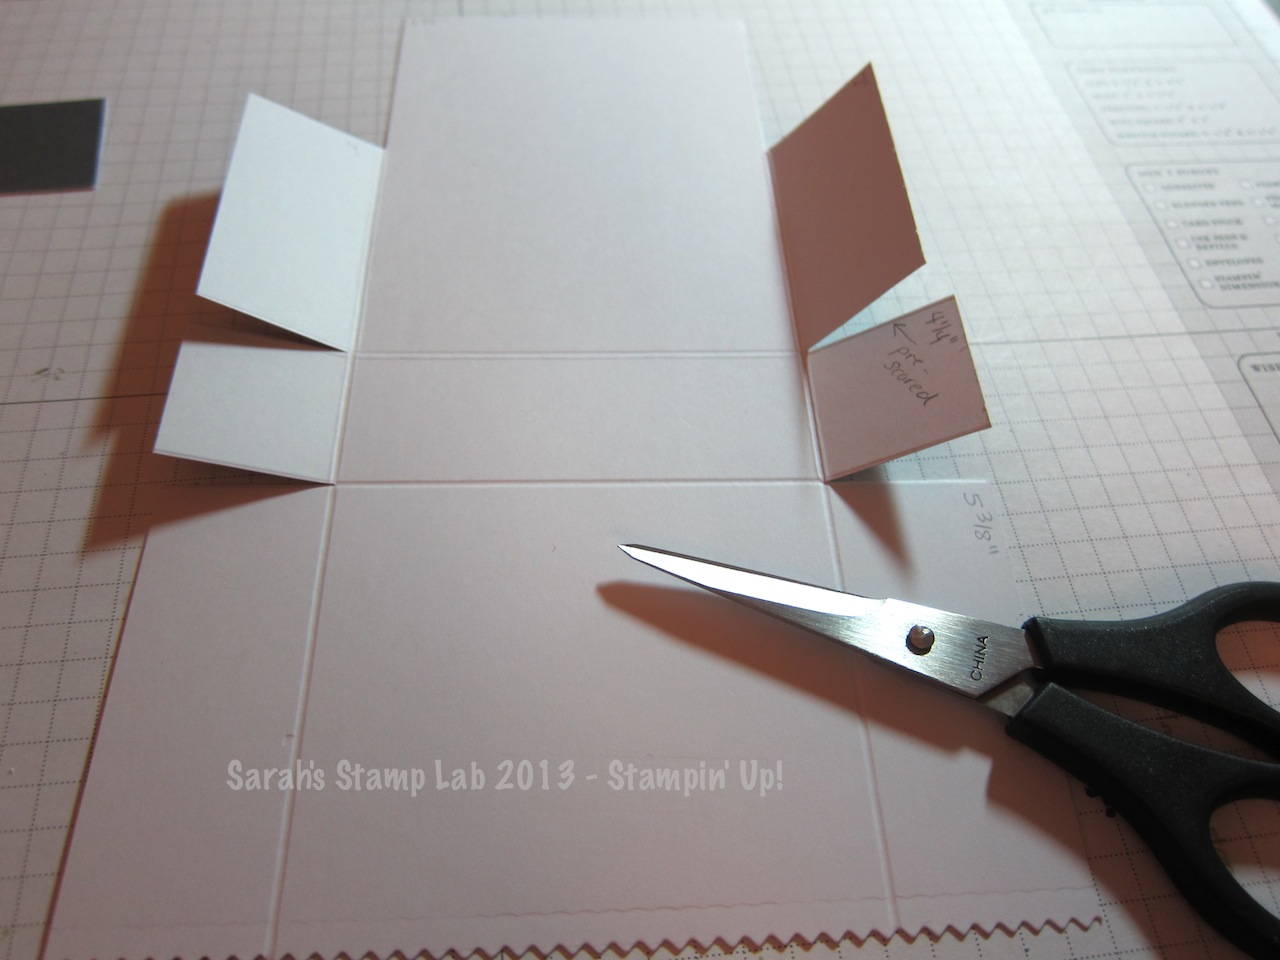
    5. Cut along the remaining two score lines to make flaps.  Fold along all of the remaining score lines and use your bone folder to make crisp creases.


    6. Apply Sticky Strip as shown.


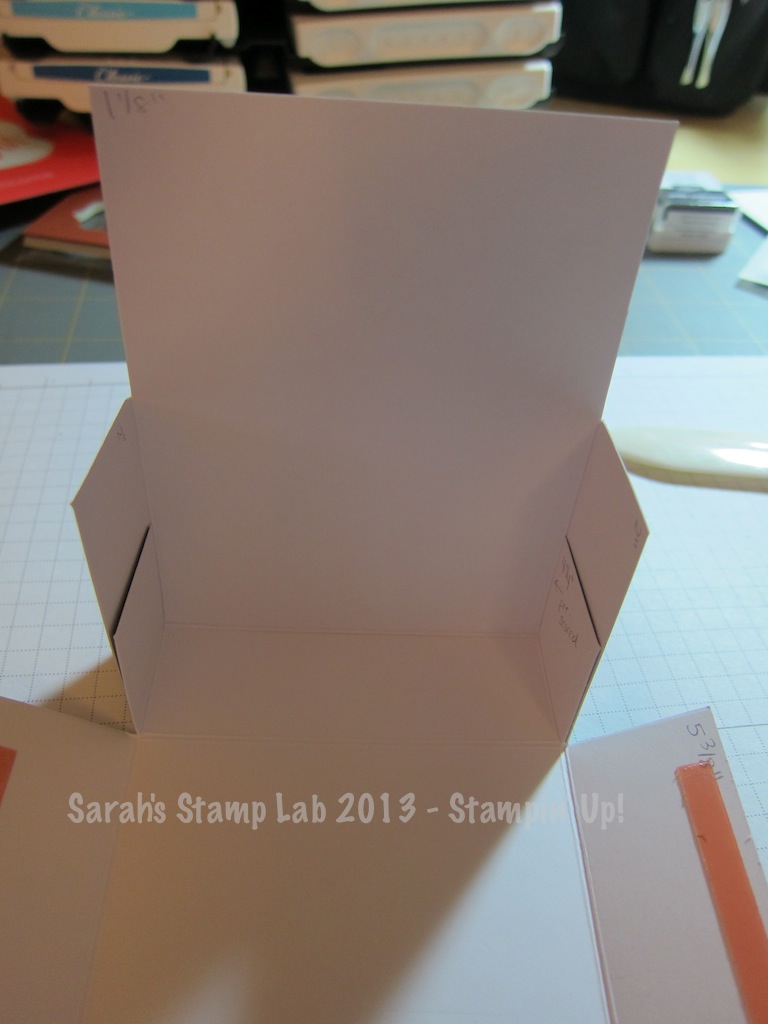
    7. Assemble the box and decorate!


    Feel free to contact me with any questions or if you would like to order any of the extra supplies used to make these projects.  

    If you would like to sign up for My Paper Pumpkin, visit the website and kindly select me, Sarah Souza,  as your demonstrator. 


    Wednesday, March 20, 2013

    Oh, Baby!

    Hi Stampers!

    I'm back with another card from the Brides and Babies Stamp a Stack.  Today's card features the Oh, Baby Single Stamp.  The newest single stamp designs are only available for purchase until the end of March, so if you have had your eye on one of them, pick it up before it's too late.  Click on the Promotions tab at the top of this page for more information on these fun, affordable stamps!


    Stampin' Supplies:
    Card Stock: Melon Mambo, Pacific Point, Daffodil Delight, Whisper White
    Designer Series Paper: Sunshine & Sprinkles
    Stamp: Oh, Baby
    Ink: Pacific Point
    Big Shot: Finishing Touches Edgelits
    Embellishments: Brights Designer Buttons, Island Indigo Baker's Twine

    Monday, March 18, 2013

    Brides and Babies Stamp a Stack Day 3

    Hi Stampers!

    Today I'm posting another card that we made at my Brides and Babies Stamp a Stack.  This is the last wedding themed card that we made.  Soon I'll be posting the baby cards!

    For this card, I got the original idea from the Stamping Rox my Fuzzy Blue Sox blog.  I changed it up a little bit and added in the sentiment from the One in a Million Stamp Set.


    Stampin' Supplies:
    Card Stock: Pool Party, Whisper White
    Embellishments: Basic Rhinestones

    Sunday, March 17, 2013

    Spring is in the Air Promotion


    New Promotions!

    Spring Surprise!


    Spring is definitely in the air, and I can't wait to show you all the new product in the 2013-2014 annual catalog.  Here's your pre-sneak peek look at A Round Array!


    This stamp set is bundled with the coordinating 7/8" Scallop Circle Punch (introduced in the 2013 Spring Catalog) just in time for Sale-A-Bration for 15% off!

    Dates:  March 15 - May 30, 2013

    Spring Surprise Bundle (English; clear) 
    Item # 133899
    $23.95

    If you just want the stamp set:
    A Round Array Stamp Set (English; clear)
    Item # 129090
    $14.95

    THe stamp set is also available in Spanish and French.  See the flyer for more ordering information about those sets.

    A Little Non-Stamping St. Patty's Day Fun!


    Hi Stampers!


    Happy St. Patty's Day!  Today I do not have any stamping projects to share but I do have a little something that I have been working on to share with you.  My first try at decorating sugar cookies with Royal Icing!

     I have been wanting to try this for a long time and I finally got the courage to go ahead with it!  Be gentle, this is only my first time so they are not perfect!  

    I decided to go with a shamrock because it is a simple shape and I only needed to use one color of icing to decorate the cookies.  I used both the sugar cookie and royal icing recipes from The Sweet Adventures of Sugar Belle blog.  Check out her blog because it's awesome!  

    First I made thicker consistency royal icing and I piped the outline of the shamrock.  I really need to practice this, but all in all, not too bad for my first time.  Then I thinned out the icing to a "flood" consistency and filled in the outline on the cookies.


    Of course I had to package up each cookie in a special way!  I found the printables on the Amanda's Parties to Go blog.  I just printed them out on Whisper White card stock and then punched the designs out with my 1-3/4" circle punch.  Then I used my 2-3/8" scallop circle punch to make the Daffodil Delight and Gumball Green Layers.  Each cookie was put in a cello bag and I tied the tag on.


    Here's a picture of the whole batch!


    I hope you enjoyed my little non-stamping post.  Don't worry...I'll be back tomorrow with another fun stamping project!


    Friday, March 15, 2013

    Brides and Babies Stamp A Stack Day 2

    Hi Stampers!

    I'm back with another card that I made for my Brides and Babies Stamp a Stack.  I originally called this a punch art card, but I think it's more like a Big Shot art card as almost all of the parts are cut using the Big Shot.  Oh well!  I do love my Big Shot!!!


    To make the gown, I cut an oval out of Whisper White and then I cut the oval across (about 2/3 of the way down if you hold the oval vertically).  This gives you the lacy looking edge.  Then attach a heart cut using the Hearts Collection Framelits and put a sash around the "waist".  Very easy!

    Stampin' Supplies:
    Card Stock: Basic Gray, Whisper White, Marina Mist, Brushed Silver
    Punches: Scallop Trim Border, Boho Blossoms
    Big Shot: Oval Framelits, Hearts Collection Framelits, Finishing Touches Edgelits
    Embellishments: Basic Pearls, Marina Mist 3/8" Striped Organdy Ribbon

    Wednesday, March 13, 2013

    Single Stamp Fun

    Hi Stampers!

    Today I'm going to show you another card featuring the new single stamps that Stampin' Up! is offering.  Remember, these are only available for a limited time - until the end of March! 


    To make the slots on either end of the tag, I pierce three holes next to each other in a vertical line with my piercing tool.  Then I thread the ribbon through the holes.

    Stampin' Supplies:
    Card Stock: Crumb Cake, Island Indigo
    Designer Series Paper: Sycamore Street (SAB #127540) ONLY AVAILABLE UNTIL MARCH 22ND!
    Stamps: Basic Label, Perfectly Penned
    Ink: Island Indigo, Tangerine Tango
    Big Shot: Apothecary Accents Collection Framelits
    Embellishments: 1/4" Satin Ribbon in Tangerine Tango from the Sycamore Street Ribbon and Buttons Pack (SAB #130812)
    Other: Paper Piercing Tool

    Monday, March 11, 2013

    Best of Birthdays!

    Hi Stampers!

    Today's card is quick and easy.  Perfect for when you need a birthday card at the last minute.  I kept the color combo pretty simple.  Easy to change it up to whatever the birthday boy or girl's favorite color is.


    Stampin' Supplies:

    Friday, March 8, 2013

    Brides and Babies Stamp A Stack Day 1

    Hi Stampers! 

    Well, the week has finally come to an end.  I hope you all have fun weekends ahead of you filled with lots of stamping!  Today I have a card that we made at my recent Brides and Babies Stamp a Stack.  It features one of the new single stamps: Towels for Two!


    I love the effect that the scallop border piece gives to the card.  It almost looks like a curtain!

     
    Stampin' Supplies:

    Wednesday, March 6, 2013

    Sale-A-Bration Case

    Hi Stampers!

    Today I have a card that I cased from the Too Cool Stamping blog.  I really didn't make any changes to her design because I thought it was perfect!  This card is a quick and simple one that you can make if you just want to have a short stamping escape!  


    Stampin' Supplies:
    Card Stock: Raspberry Ripple, More Mustard, Whisper White
    Designer Series Paper: International Bazaar
    Stamps: Bloomin' Marvelous (SAB 129651[w]; 129654[c])
    Ink: Raspberry Ripple, More Mustard, Tangerine Tango
    Big Shot: Apothecary Accents Framelits
    Punches: Scallop Edge Border 
    Embellishments: Sycamore Street Ribbon & Button Pack (SAB 130812)

    Monday, March 4, 2013

    Swallowtail Case with a Twist!

    Happy Monday Stampers!

    Today I have a card for you that I cased from the Stamp with Amy K blog.  I really loved her design but I had to change it up to make it my own!  This card is featuring the chalkboard technique.  I love the look that embossing in multiple colors gives you.  I think I'm going to have to try this more often.

    Here's a close up of the little butterfly medallion I made.  I love the new Bitty Butterfly punch so much!


    Stampin' Supplies:
    Embellishments: Large Basic Rhinestone, Pool Party Ribbon from Sycamore Street Ribbon and Button Pack (SAB #130812), Delicate Details Lace Tape

    Friday, March 1, 2013

    Exciting News for March!

    Hi Stampers!

    Today you get a double dose of posts from me!  Why?  Because I have two exciting new things to share with you!

    First up, it's the beginning of the month and that mean......drum roll please......

    A new Best of 25 Stamp Set!!!!!

    Best of FLOWERS!!!

    I love love love that silhouette stamp in the lower left corner.  I never purchased it when it was available and have always regretted it.  Well now....no regrets! YAY!!!!

    I have updated the Promotions tab to include the new stamp set.

    If this wasn't exciting enough, Stampin' Up! has announced today something that has made me over the moon happy!

    PHOTOPOLYMER STAMPS


    I have been waiting for SU to release a product like this.  It's a fantastic concept that will allow you to really see where you are stamping everything.  Plus, no need to buy new blocks!  These stamps work perfectly with the acrylic blocks you already own.  How fantastic is this????

    What makes them so great?
    • They're entirely transparent for perfect placement every time! 
    • They are durable. The photopolymer material is designed to last. 
    • Can you say sticky? (Don't worry; in a good way.) These stamps stick amazingly well to our clear blocks.
    • They're age tested. They won't yellow or cloud up over time. 
    • They use FDA, food-safe material. How far can you stretch your stamping creativity? 
    • We could go on, but we'll let you try them for yourself.
    They are clearly a great choice.

    Item Description Price
    132956 Designer Typeset Photopolymer Stamp Set
    Recommend clear blocks A, B, G, F, and I. Purchase separately.
    Includes 57 pieces. (Don't faint! This is a good overwhelming feeling.)
    $13.95

    The Fine Print

    • Photopolymer stamps will be offered on a trial basis. Based on popularity, we hope to release more photopolymer stamp sets over the coming months. At this time we don't plan on offering a line of photopolymer sets as expansive as our wood-mount and clear-mount lines.
    • Available on all order types beginning March 1, 2013. 
    • Not available in wood-mount or clear-mount.  
    • All photopolymer will be packaged in cello bag w/insert, but don't forget you can store them in our clear cases. (Item# 119105)

    Orders can be placed through my online store , or directly through me by email .  Contact me if you have any questions!